Measure Twice, Cut Three Times

I obsess about the big picture – am I on budget, will I meet my project deadline, are my partners happy, are the contractors doing good work – things like that.

My wife…my wife obsesses about the finishes.  She’ll spend 15 minutes debating me about shades of gray (hehe), the placement of the kitchen island, the budget (“but for $200 more, this is light fixture soooo much better”) … and that’s exactly what I need!  I have little interest in being bothered with that kind of stuff; I’ve got far bigger issues to deal with.

With that said, it’s no surprise that I missed a rather glaring issue in out master bedroom that she saw within the first 5 seconds of stepping in the room.

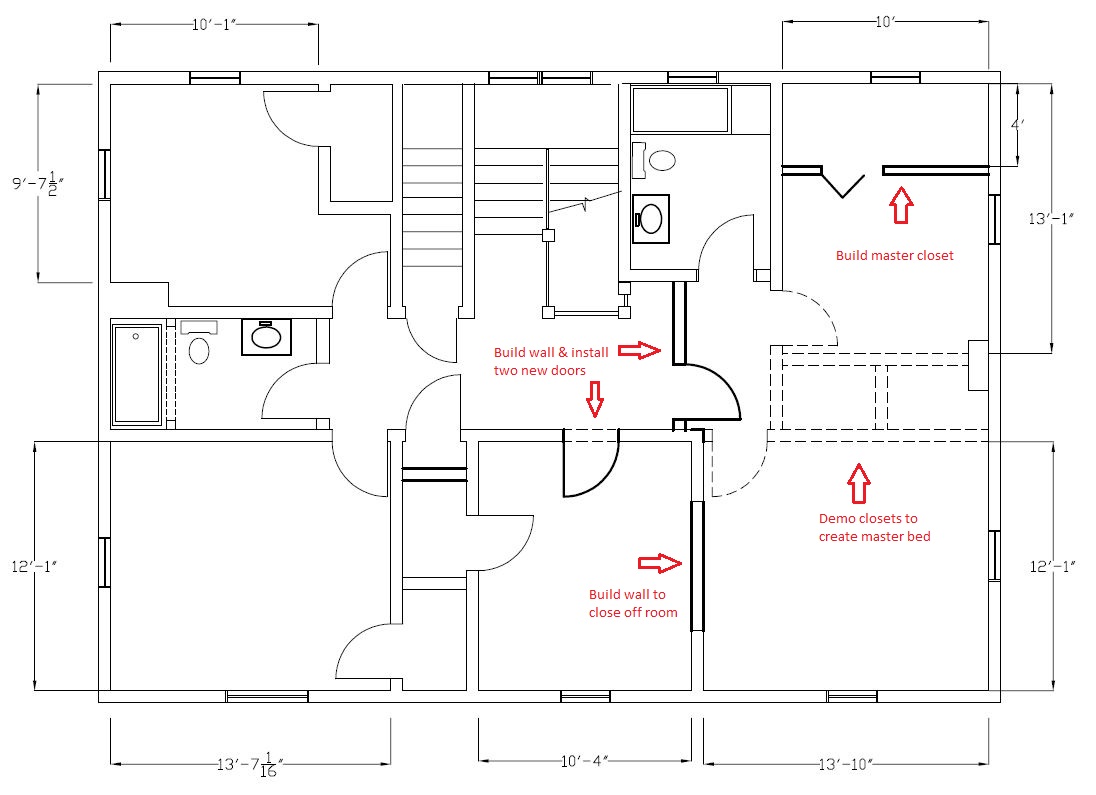
As we’ve wrote about in the past, the master bedroom went through several iterations – we ended up expanding the size of the closet and adding a large fireplace.   This all happened after we had drawn new electrical for overhead lights.   You get the picture … the lighting placement just didn’t look right after we moved things around.

The first time we moved the light placement was after we expanded the closet.  I told my electrician to “center it.”  I never looked at it again.

My wife, however, quickly realized it wasn’t “centered” with the fireplace…it just looked off.  Fortunately for me, my father is an electrical engineer and charges me $0 per hour.  A little father-son bonding and 1 hour of work, the lighting was moved for a third and final time.

Check it out below – far left hole (placement #1), large hole in the middle (placement #2), final hole centered with fireplace (placement #3).

IMG_6543

Master Bath – Tile Sneak Peak

Construction is moving fast! Much faster than I can keep up with on the blog!  Our crews are finishing up some minor drywall repairs, installing trim around the new doors and windows, crown molding in a few of the rooms and, most importantly, tile in both the master and kids bathroom!

Here is a sneak peak, with compliments to The Tile Shop for their awesome product selection and design inspiration. Can’t wait to show off the finished product!

IMG_6327

Dance Floor. Lets Work!

My wife and I own/operate a few properties that we rent to the students of our Alma Mater, John Carroll University.  We’ve heard plenty of landlord horror stories, particularly those related to college students, but (*knock on wood*) all of our tenants have been tremendous thus far.

Anyways, we’re planning a kitchen remodel at one of the properties over their Christmas break.  I started a text message thread with the kids to make them aware so they could get their stuff out of the kitchen.  As expected, they were thankful the work was being done.  After all, they’re getting new cabinets and granite. Why wouldn’t they be happy?

Then came 1:12AM on a drinking night.  Apparently, they forgot their landlord was on the thread:

jcu texts

Century Home: Second Floor Layout

Old homes present interesting problems, especially with the intention of flipping. One of the most common characteristics of  homes built during the 1920-30’s is the lack of bedroom space.  In the early 20th century, families typically spent their time together on the first floor and rarely retired to their bedrooms for anything but sleep.  Living rooms and dining rooms were huge, but bedrooms and kitchens were tiny.

Today’s buyers, however, want space and lots of it.  Master suites with an attached bath are huge selling points, but rarely seen outside of new construction.

With that in mind a quite a bit of space to work with, we’ve decided to do a little bit of rearranging on the second floor.  The home has five bedrooms and two full bathrooms on the second floor, none of which are all that big. As you can see in the architectural drawing below (thanks, dad!), we’re turning the home into a four bedroom property.

The current plan is to create a large master bedroom that makes up the entire right side of the second floor.  The cost in doing so was pretty nominal (demo two closets & build two walls), but I think it adds tremendous value and appeal to the property.

2nd floor


New entryway to the master bedroom, looking from the hallway.  Closets used to separate the two rooms.

New entryway to the master bedroom, looking from the hallway. Closets used to separate the two rooms.

Century Home: Interior Before Pictures

We’re officially on day 6 of construction at the Century House.  So far, our HVAC contractor has been removing the existing radiators and associated plumbing in preparation for a whole-house forced air system.  Our general trades will begin demo of the kitchen, bathrooms and a few walls on the second floor this week.  We’re beyond excited to be in the full throws of rehab.

I stopped by the house earlier this week to take a few “before” interior photos.  Below is a quick photo tour of what will, in 3-4 months, be a beautifully restored home in  a storied neighborhood.

Note: The home was vacant for two years and was broken into by some punk kids, who decided to add a little bit of their own vulgar graffiti. 

IMG_4613

Butler stairwell and butler’s pantry off the kitchen. Both will be demo’d to increase the size of the kitchen by 40%.

IMG_4614

Kitchen – cabinets and soffit to be demo’d this week. Increased square footage will allow for a center island.

Dining Room - love the coffered ceiling!

Dining Room – love the coffered ceiling!

Looking down from the stairwell to the front entry.  To the left, the living room.  To the right, the dining room.

Looking down from the stairwell to the front entry. To the left, the living room. To the right, the dining room.

Center hall colonial - stairwell leading to the second floor.

Center hall colonial – stairwell leading to the second floor.

HUGE living room.

HUGE living room.

The hardware in the home is tremendous!

The hardware in the home is tremendous!

Third floor.  Will make for an amazing rec room.

Third floor. Will make for an amazing rec room.

Second floor hallway.

Second floor hallway.

Current master bath.

Current master bath.